Table of Content
Get in a car and drive thyself to a nail salon. Sry, just had to remind you one last time of the best—and honestly, probably fastest—solution. The acetone will help break down the acrylics, so you can buff or scrape off the rest with an orange stick or cuticle pusher. Cut your faux nails with the help of a nail cutter. Start with filing and buffing your nail extension at the top until you can easily trim the acrylic nails and cut through them.
Next—similar to removing gel nail polish—soak cotton pads in acetone and place them on your nails. The more of the acrylic nail you can file off, the less time you’ll spend soaking your fingers in acetone later. Make sure to leave behind a thin layer of acrylic. This will protect your natural nail from accidently filling it down too much. Plus, don’t worry if you can’t get all the acrylic off – the acetone will remove it.
Yes, You Can Actually Make A Claw Hair Clip Look Chic. Here’s How.
No matter which method is used, it’s highly recommended to see a professional for removal to help prevent any damage to the natural nails. Pull the aluminum foil gently and the acrylic nail should come off with it. If you feel resistance, keep it wrapped for another five to seven minutes.
But you can also use this for removing acrylic nails. You need a nail clip, tweezers, cotton balls, aluminum foil/tape, and cuticle oil. Once you’ve gathered all the necessary tools, it’s time to begin the acrylic nail removal process. Trim down acrylics as best you can without getting too close to the nail bed. "As you're soaking your acrylics, you'll notice they'll start to melt and become really gooey and gross-looking," says Mytien Le. Take your cuticle pusher or orange stick and carefully push the acrylic off your nail, starting from the cuticle area to the free edge.
Step 4: Use a metal cuticle pusher to push the acrylics off
“Regular polish remover will not totally work, as it will not break the acrylic down — it will make it sticky and gummy,” says Kandalec. You’ll end up with a bigger mess that’s harder to remove, which is why 100% acetone is key. “The safest way to remove an acrylic or dip manicure at home is by using what I call the ‘the soak and roll’ method,” says Kandalec. Detailed manicures aren’t a new trend—Black women have embraced bold nail art on their extra long manis for years. As beauty trends come and go, one thing that remains consistent is nail art continues to become more and more elaborate. With a little bit of patience and a lot of hydration, you'll be back on the road to long, gorgeous natural nails in no time.
Well, for starters, they would have a well-ventilated and clean station with all the necessary materials. After you’ve decided upon your station, place a towel on the surface you’ll be using. This will protect your table from the harsh chemicals of acetone. If you need some visual help with the acrylic removal process, check out Kandalec’s video below.
What Therapists Personally Do To Handle Their Holiday Stress
Press-on nails to fake the look of acrylics without going to the salon. Lizzo Combined Four Different Nail Trends in One Manicure at the People's Choice AwardsHere are the exact products her nail artist used to achieve the look. Throughout this process, you'll want to ask yourself, "What would my manicurist do?" For starters, they'd set up a clean, well-ventilated work area. DIY nail removal is an easy way to save some time and some coins. Gently and carefully sand down the acrylics with a sanding bit, taking off the top layer of your acrylics. This method is easier than the dental floss method.
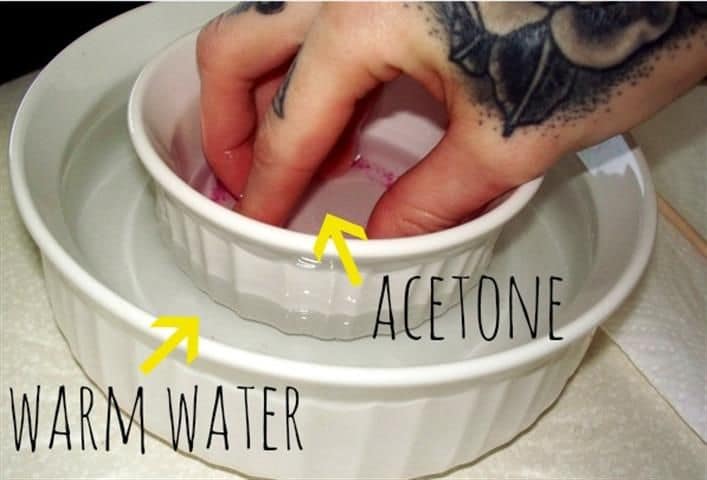
Now that you've gone through the process of removing all of the acrylic nails, lightly buff your clean nails to smooth the surface and remove any leftover residue. For best results, buff from the base of the nail toward the edge . Again, make sure to be mindful of not over-buffing — just buff lightly enough to remove whatever is left on the nail. You can also shape the nails as needed during this step. After you've finished buffing each nail, grab a small bowl that your hands can easily fit into and fill it with 100% pure acetone. The amount in the bowl does not matter, as long as you can fully dip your nails into the mixture .
Not only does this create a fun vibe, but it will also help you achieve better results. You might even want to put on some soothing music in the background for the full experience. Sit at a table that can be easily cleaned afterward, considering you'll be clipping your nails and using products such as acetone. Alternatively, you can use a cuticle pusher or orange stick to gently pry the edges of the nail off.
Soak-off hard gel, a sturdier gel that’s often used for nail extensions, is removed in the same way, but with more filing and longer soaking. And finally there’s hard gel that can be removed only by filing. Cause damage to your natural nails, so it’s best used when your acrylic has already begun to come loose or lift. She brings nearly a decade of writing and editing expertise, and her work has appeared in Allure, Health, Fitness, Marie Claire, StyleCaster, and Parents. She also has an unhealthy adoration for Tom Hanks and would like to please meet him one day, if you could arrange that.
If you don’t have a buffer, use a file or cuticle pusher and scrape away. If you don't want to use a bowl, you can use aluminum foil instead. After 30 minutes of soaking, check on your nails to gauge the progress.
These nails are transparent and require nail polish to give it the end look. You may go a little extra and try out the tools to give it a perfect look. After this long, somewhat tedious process, it is crucial to rehydrate your nails.
Soak a cotton ball in acetone and place it over the acrylic nail. “If you just sit there long enough, you’ll see the dip lift off,” Ms. Logan said. It will melt down in acetone.” After it lifts, wipe off the excess with a towel and shape your nails. You can also file the topcoat of the dip powder before you soak to make the process a little faster. While you’re filing, you’ll notice at some point that the acrylic is drying up and no longer sticky.


No comments:
Post a Comment